Categories
Complete Projects September 2021

Summer Update: Frigate and Bomber

09/06/2021 – Well that was quite a break, wasn’t it. Sorry for the delay there! When I last left off, I had finished up the Freespace fan fighter Achilles, busted my back, drew a Homeworld fan frigate, and gotten off to a good start on it.

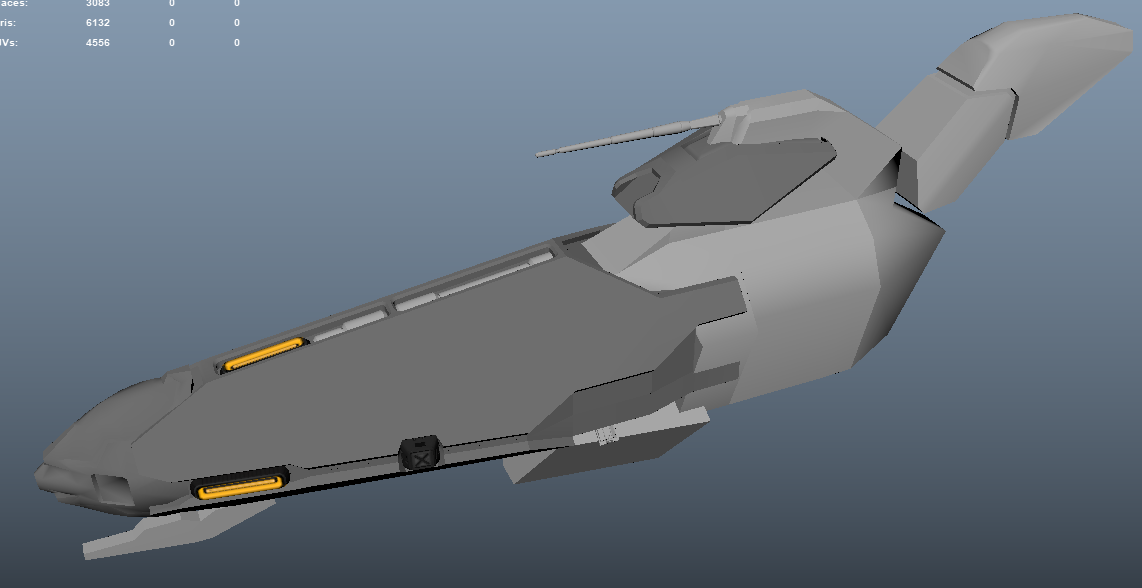
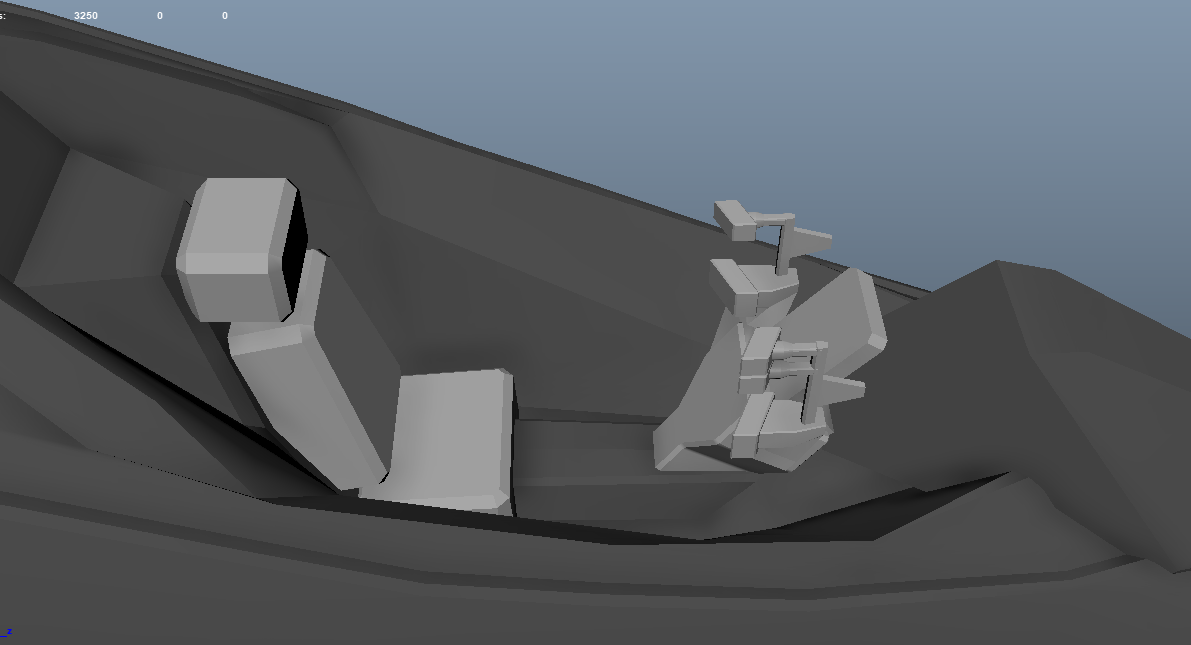
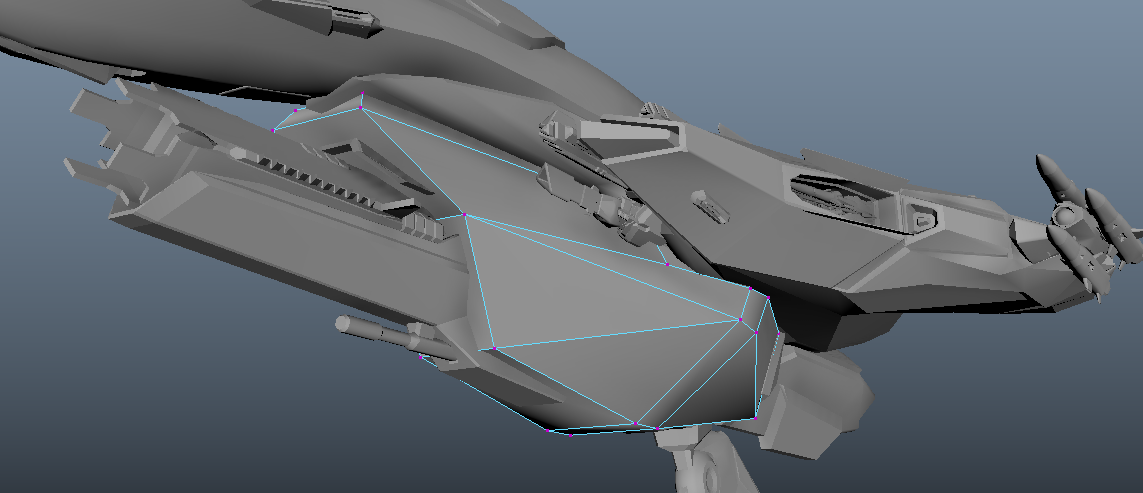
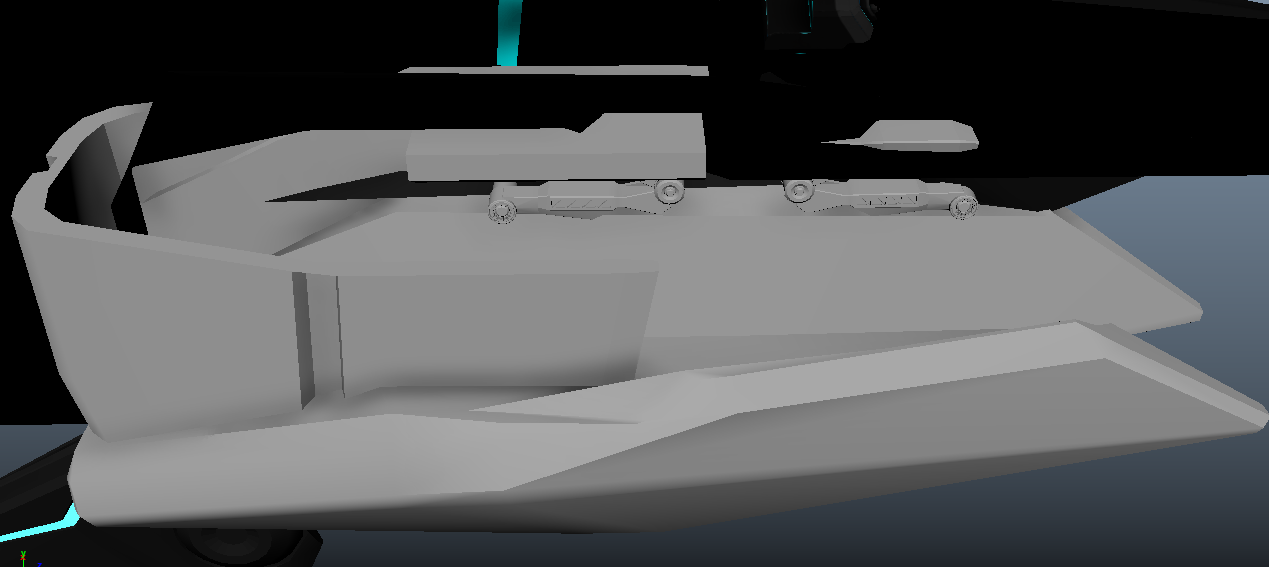
The problem there was with the belly module – I never could get it looking quite the way I wanted on its intersection with the main hull. Click the screenshot below to be taken to a p3d of the frigate as it stands currently. Sharp-eyed viewers will note a teeny tiny radar dish hovering in space right under the nose, that’s a detail that will make its way onto the bridge at some point.

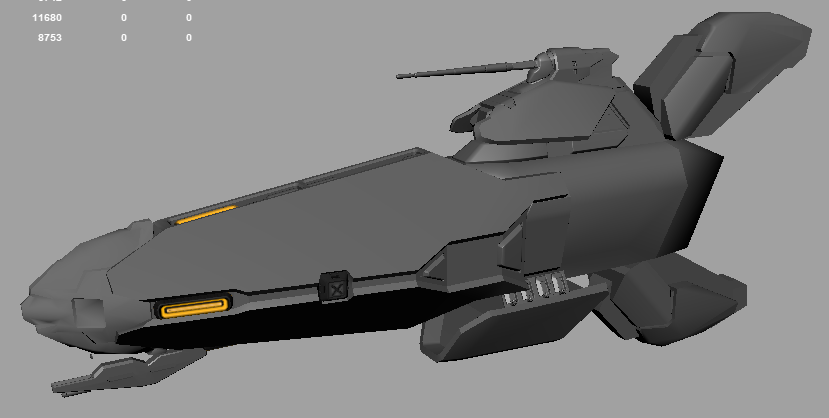
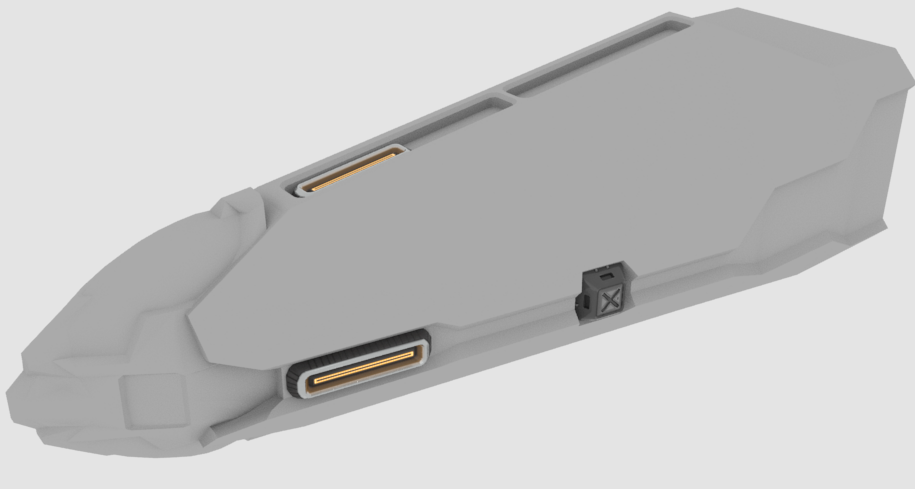
I fully intend to finish the ship up the ship at some point. The belly module issue started from that row of four hatches but as I tried to square away my concept with my model, I quickly realized there were a number of flaws with the concept itself. Take a look at the comparison below:

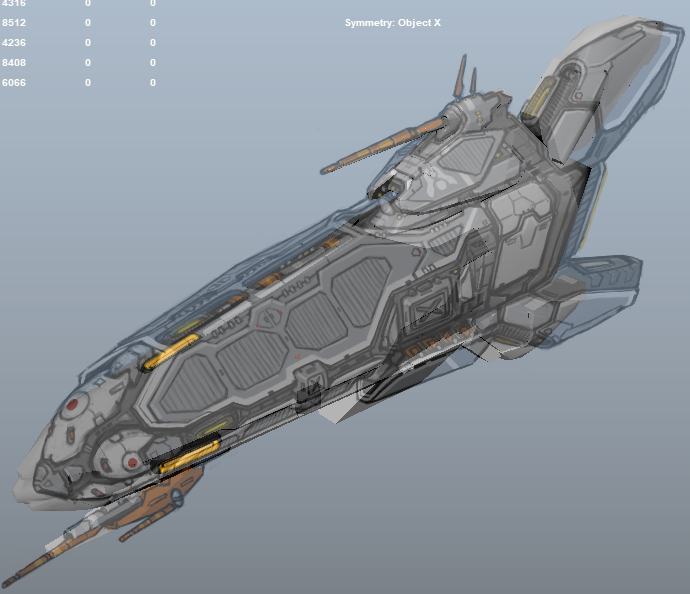
The frigate is by no means unsalvageable, but a lot of decisions have to be made about what component goes where before it can be resumed. But, that’s only part of the story.

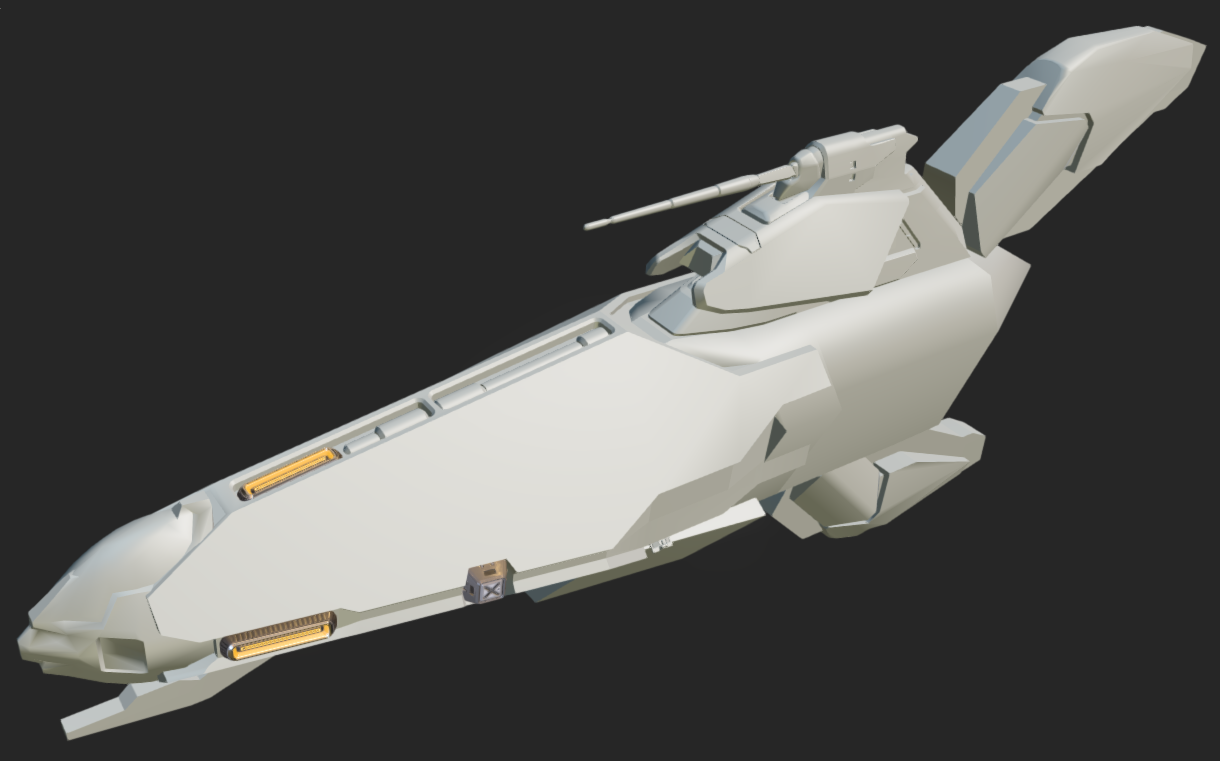
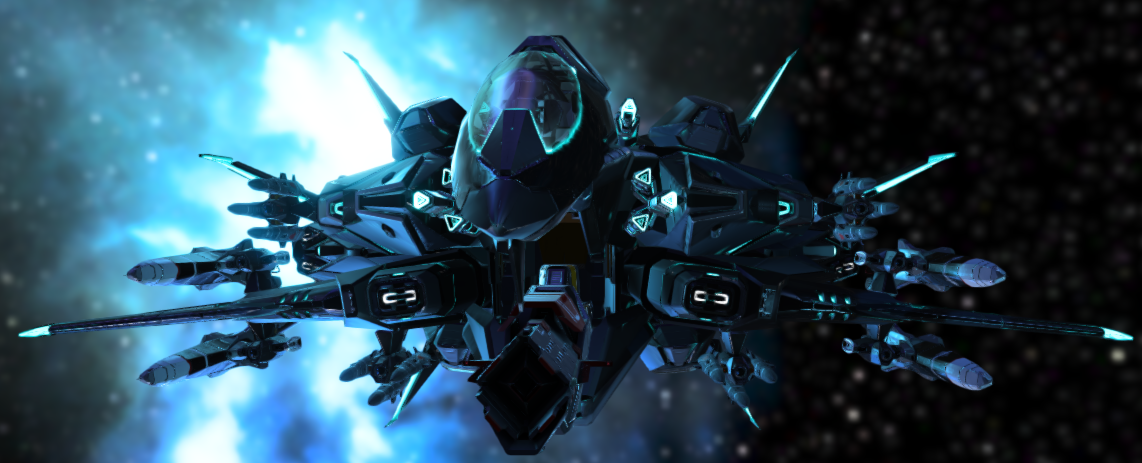
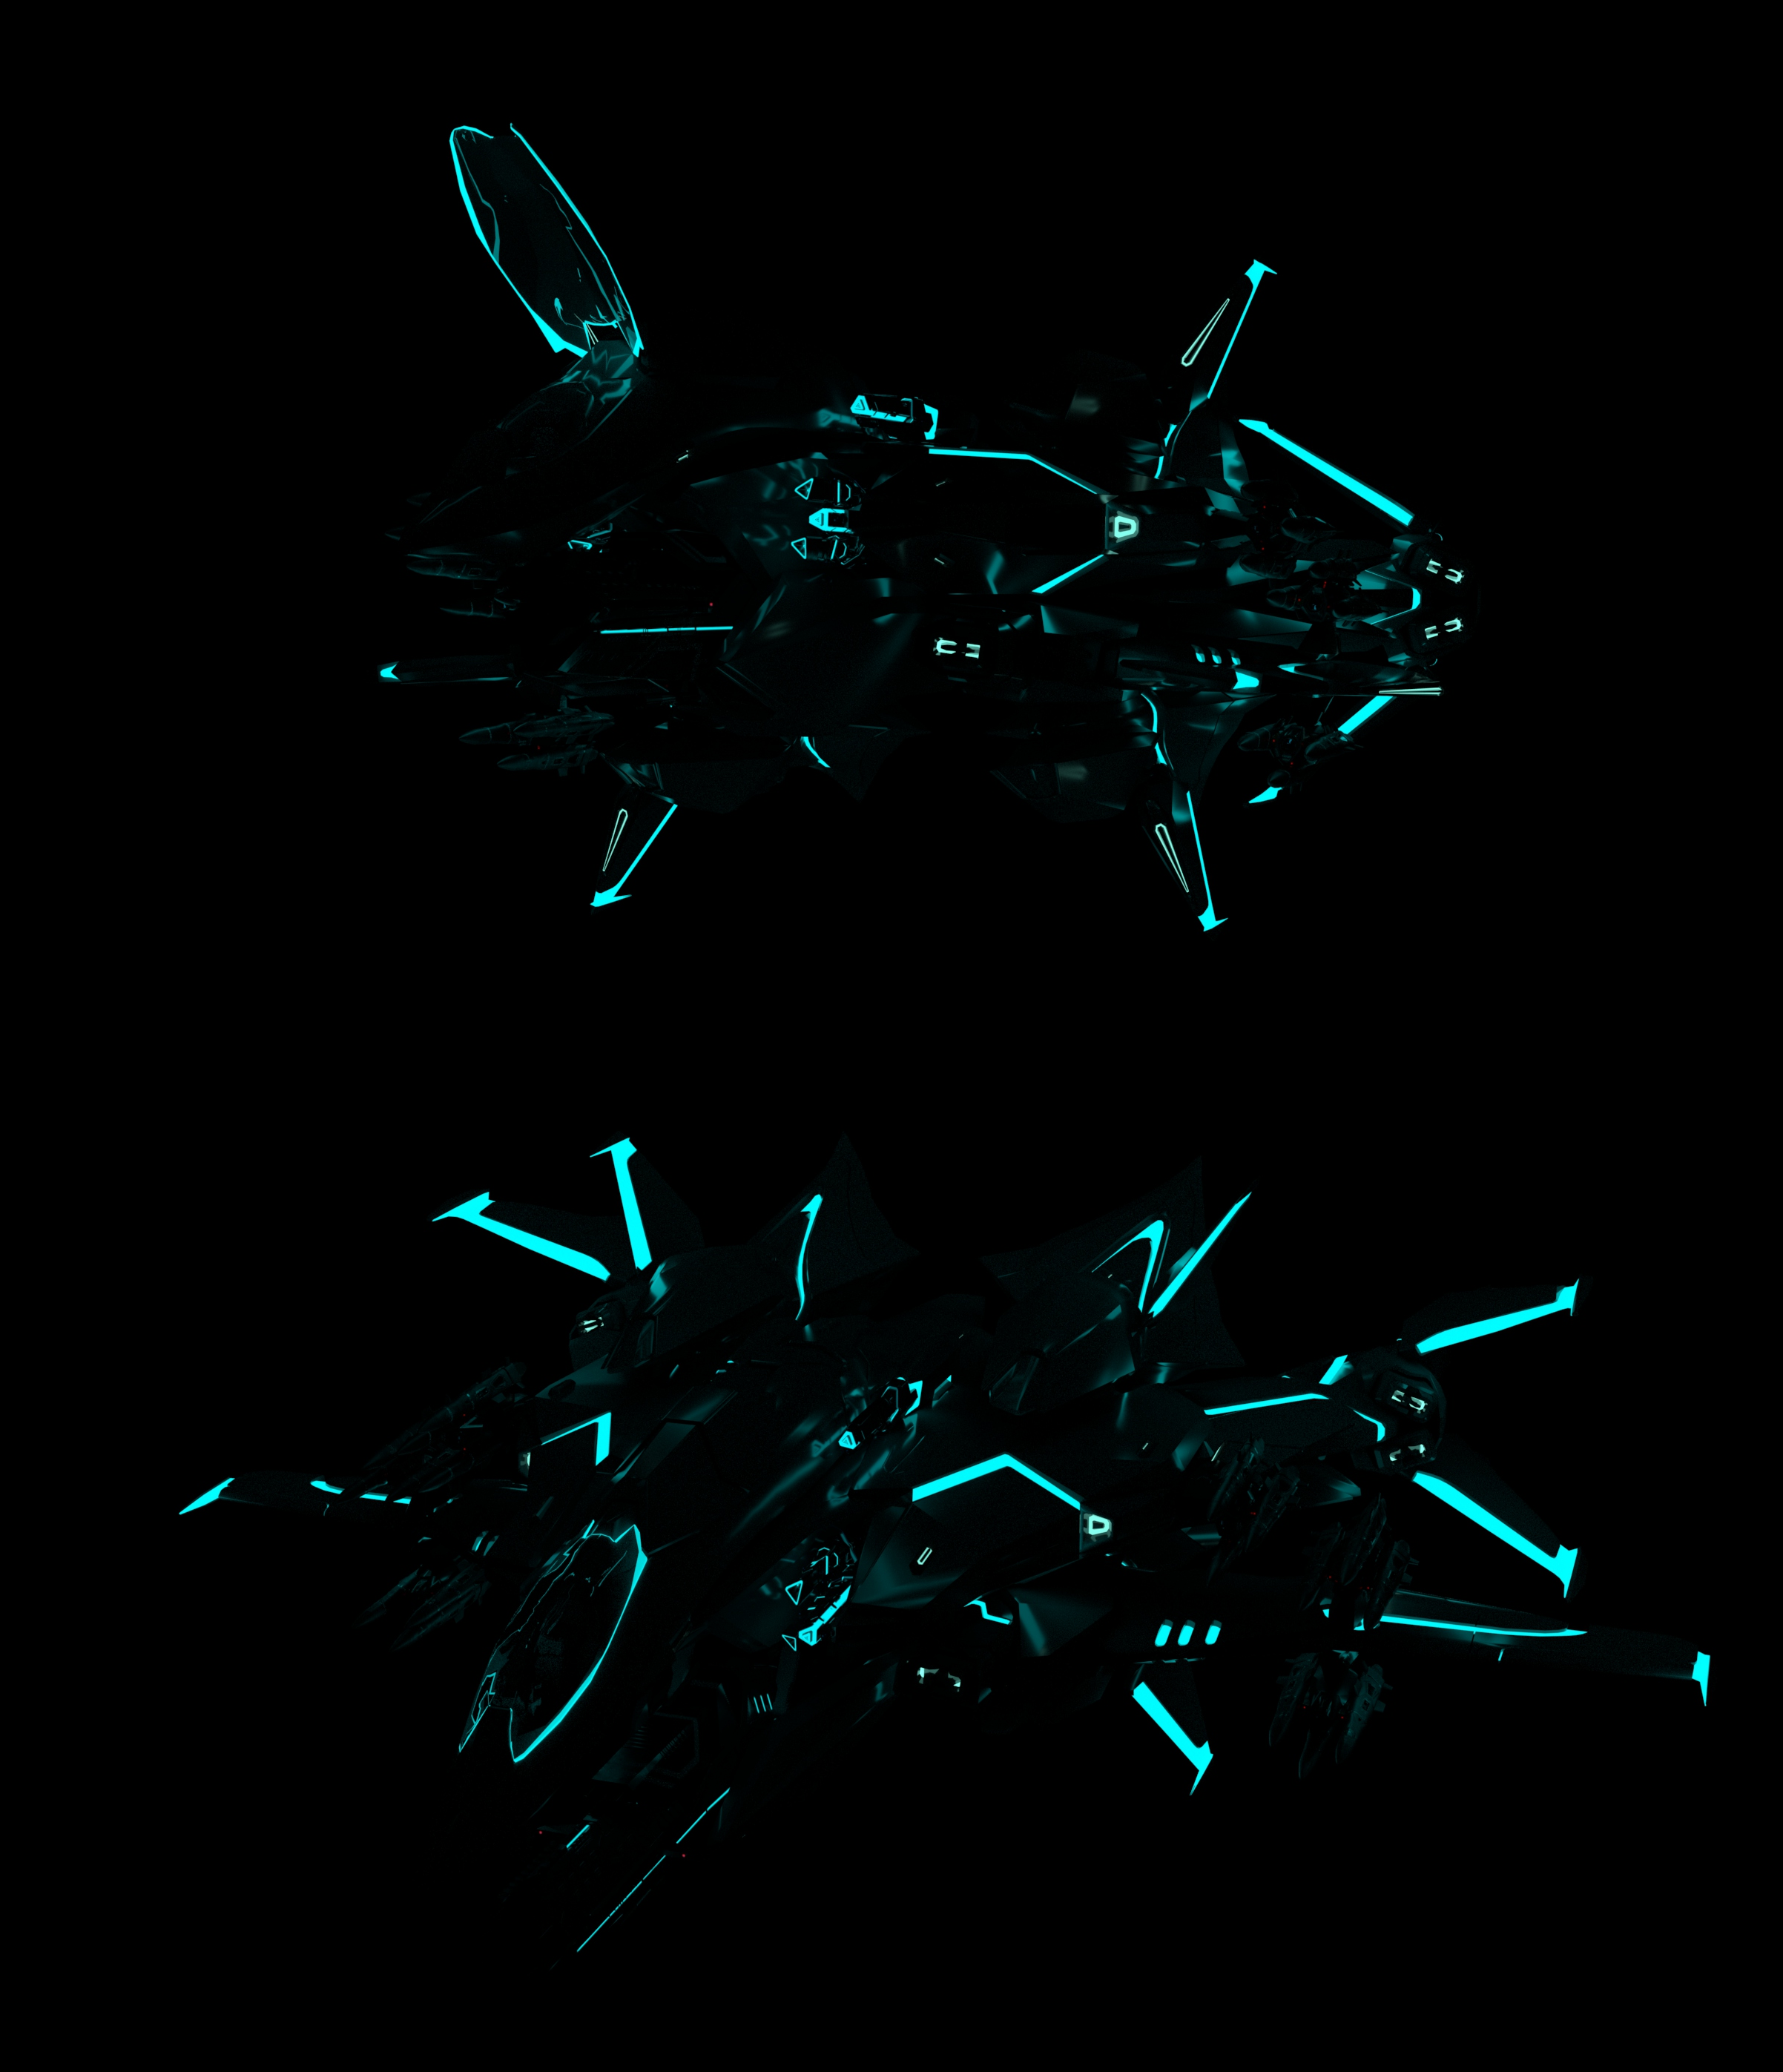
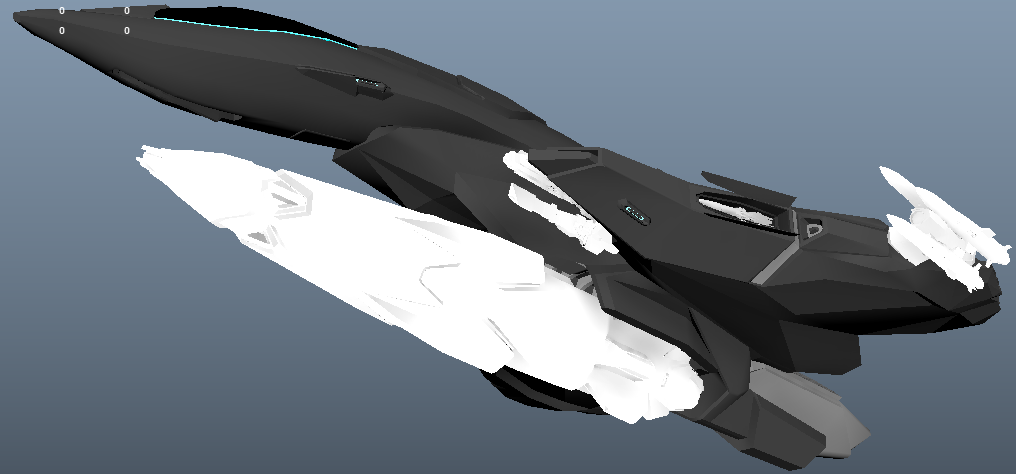
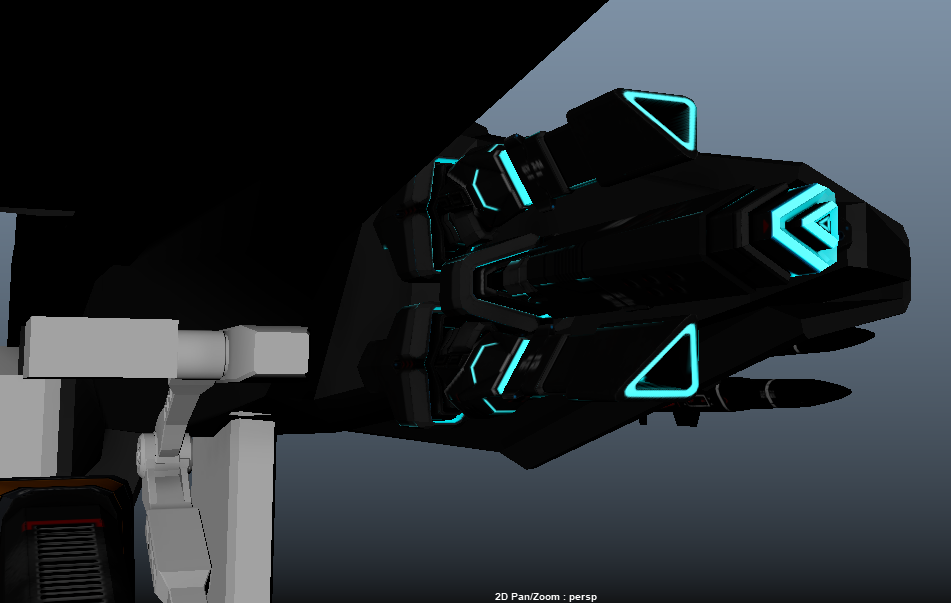
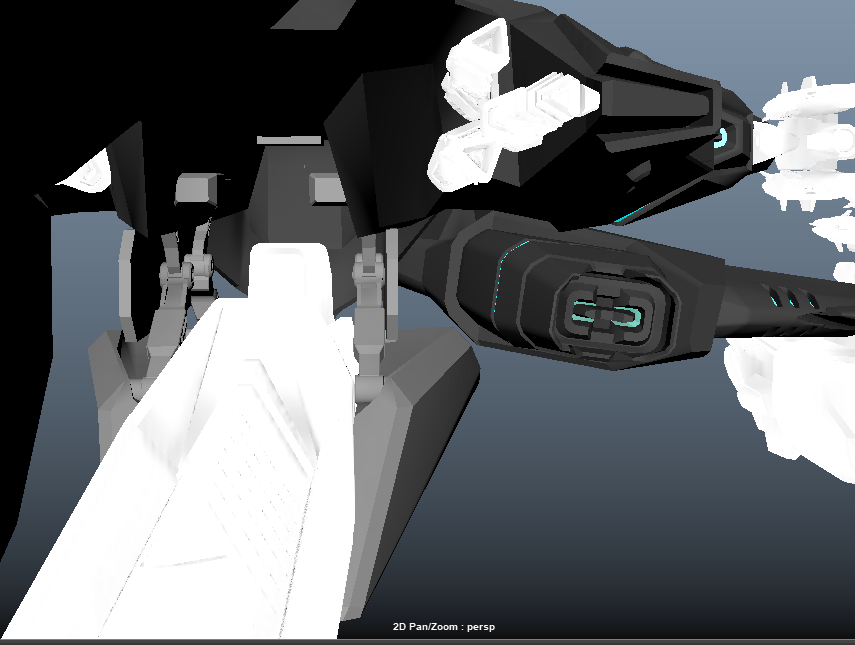
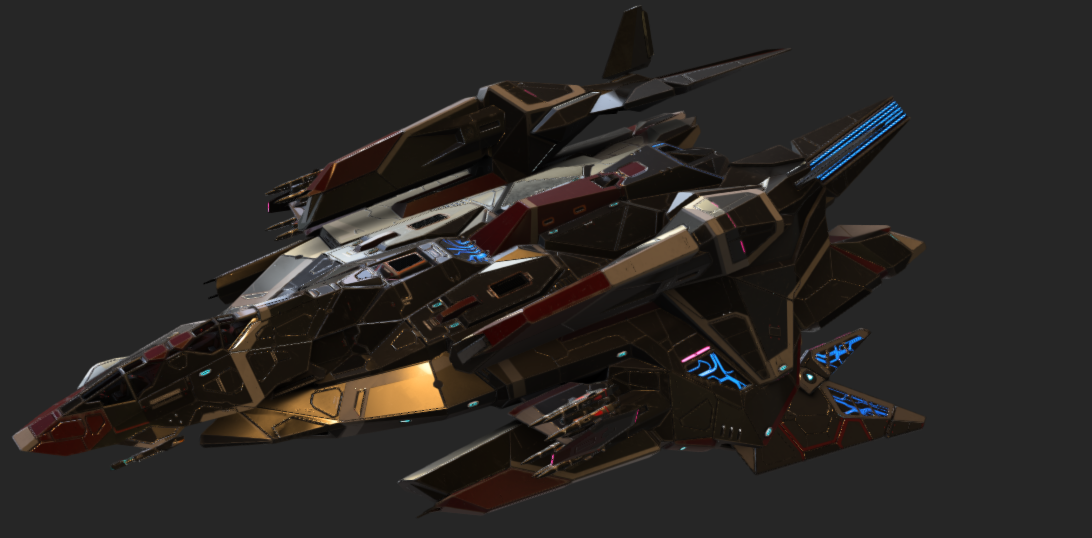
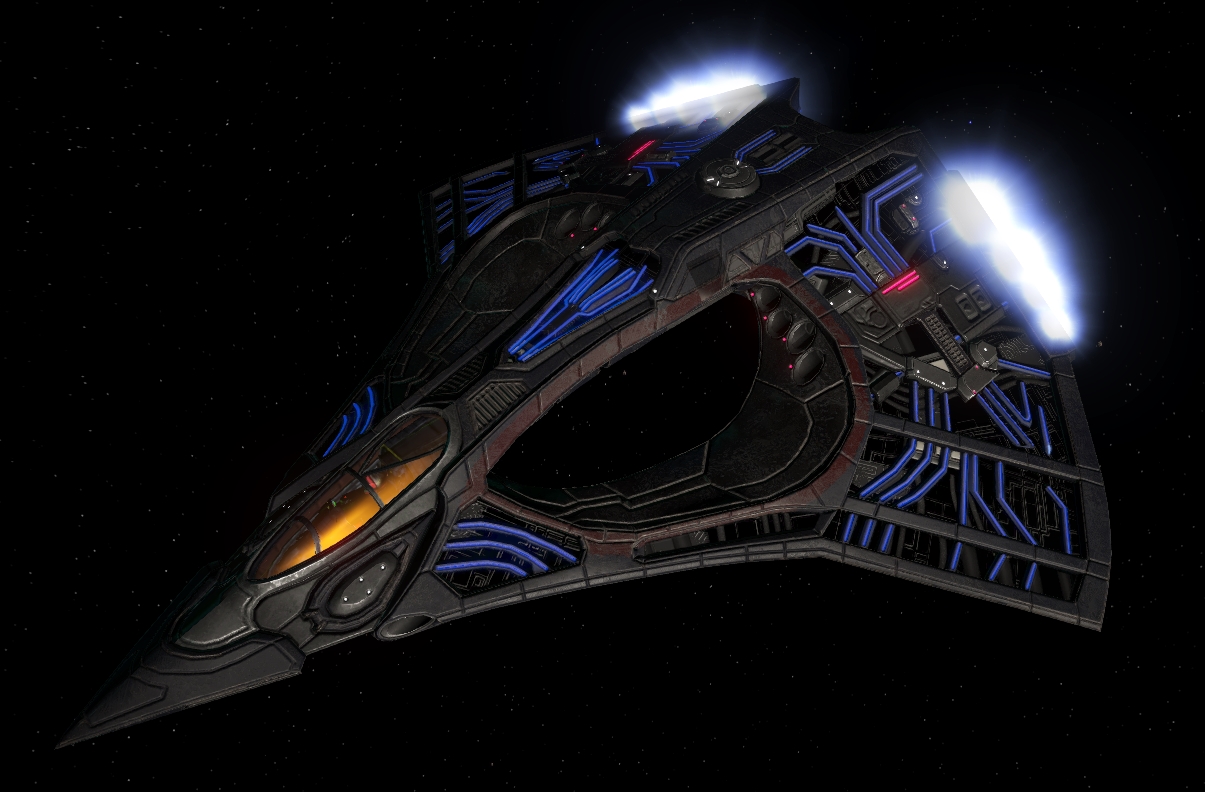
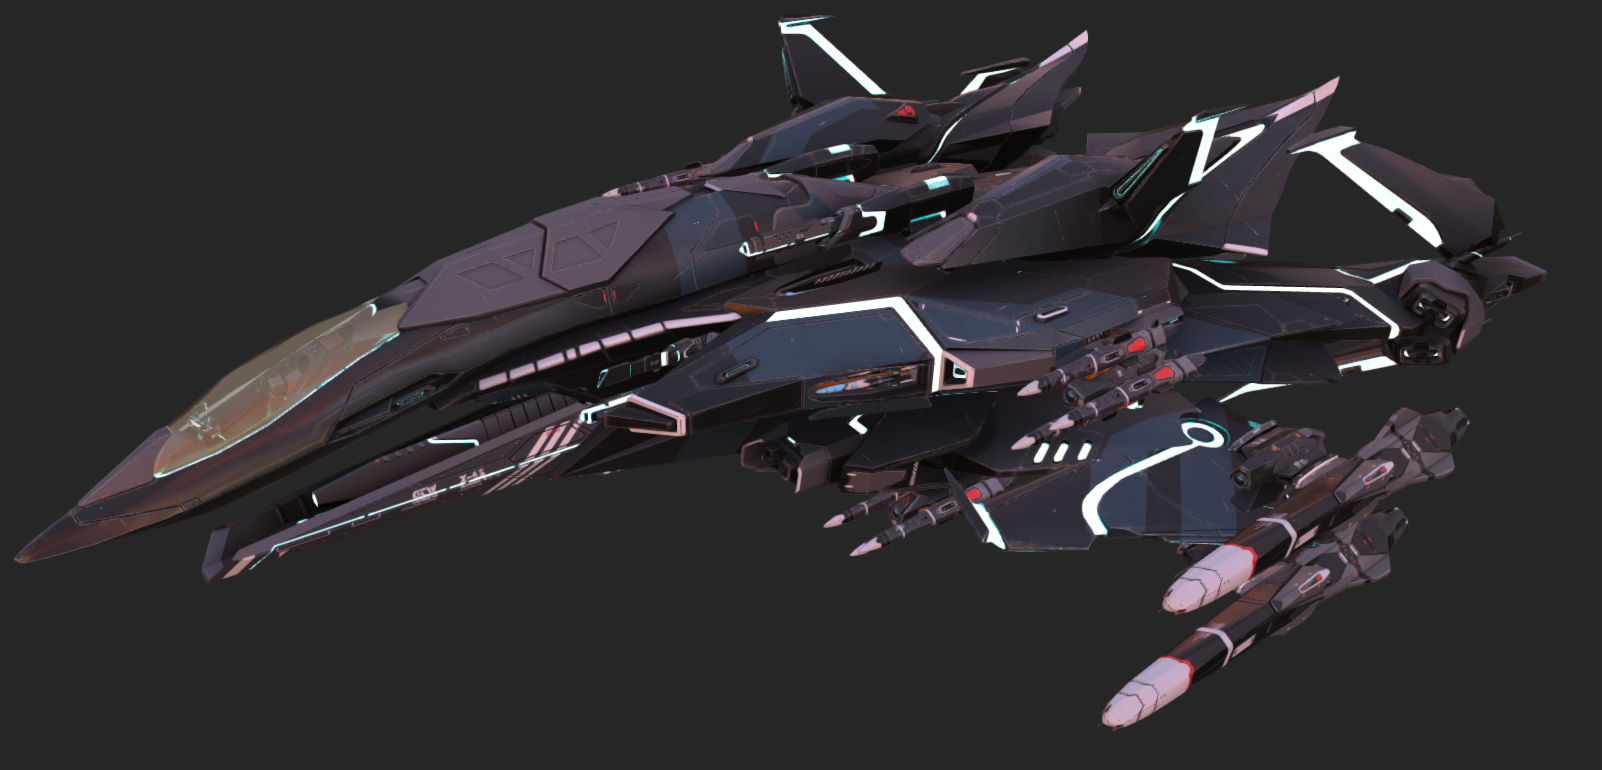
A variety of projects filled the intervening time – the biggest of which was another Freespace fan fighter. This time it was a bomber, as opposed to a heavy interceptor like the Achilles. This bomber is called the Marathon – like the Achilles, it’s a mix of modern inspirations and classic canonical Freespace ships. Leading with the goods, click the image below to view it, completed, on p3d! Or here for an alternate dark environment, showing the lit interior.

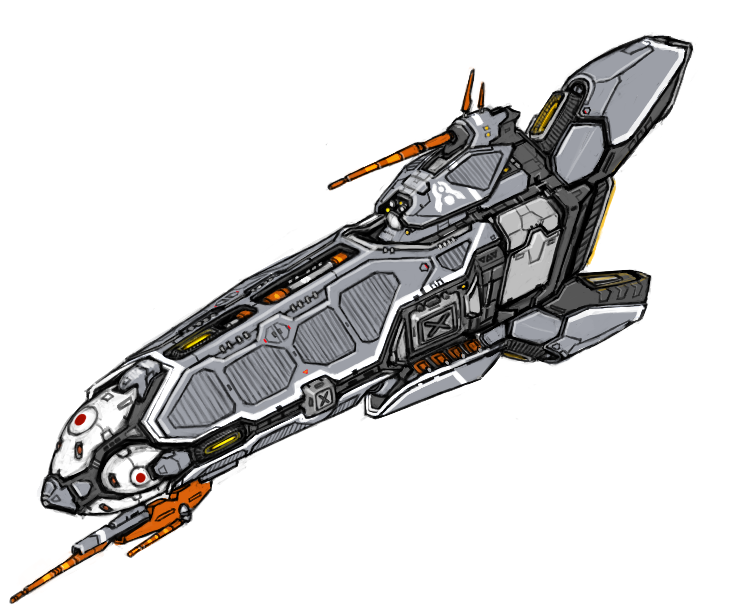
Unlike the Tron and anime inspirations for the Achilles, the Marathon draws the most from the SSV Normandy from the first Mass Effect game. Click the image below to view it on the source site.

The Normandy SR-1 is a personal favorite of mine for its sleek dynamic profile that efficiently conveys speed. I never was a fan of how they lengthened the main hull without increasing any of the other proportions for Mass Effect 2 and 3. The biggest influence on the Marathon is the four limb structure and general arrowhead shape.

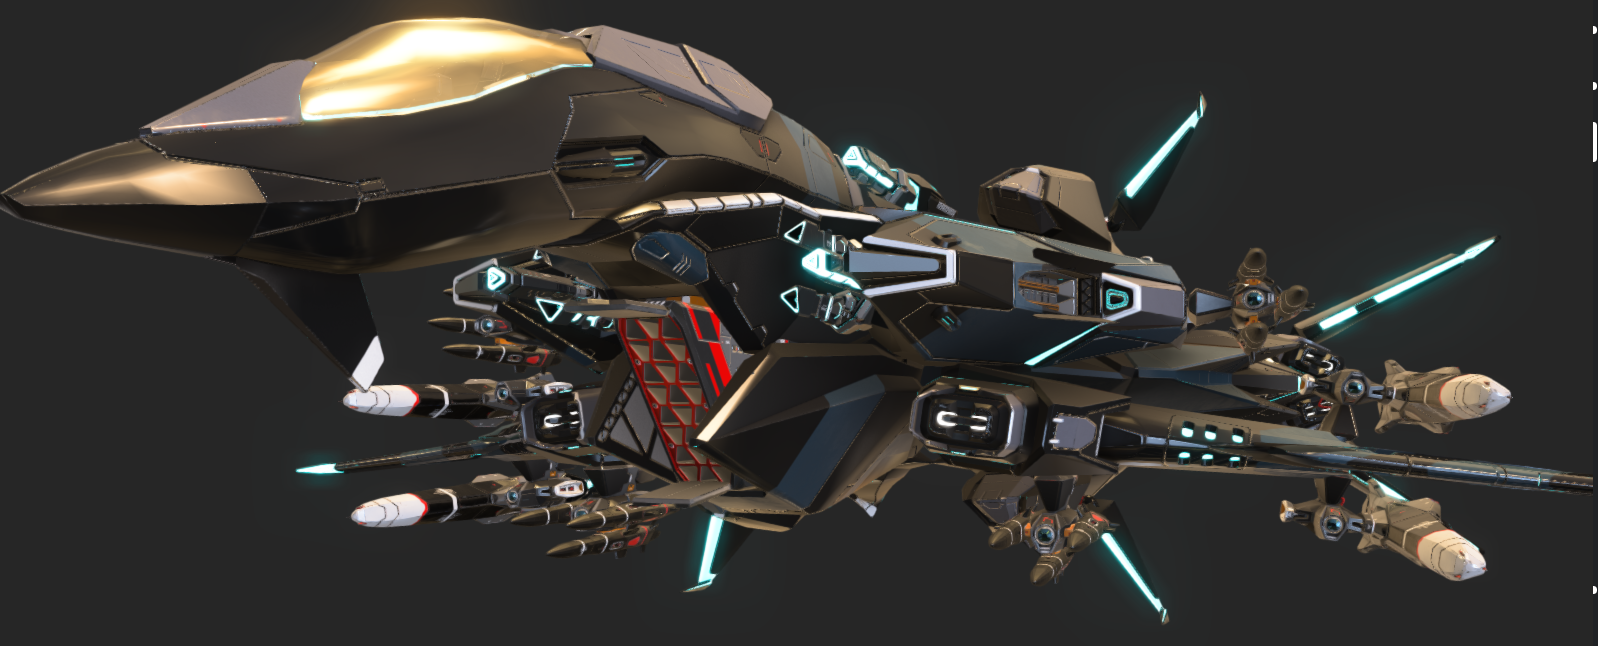
The other big influence on the Marathon was the canonical Freespace stealth fighter, the Pegasus. Click the image for higher res.

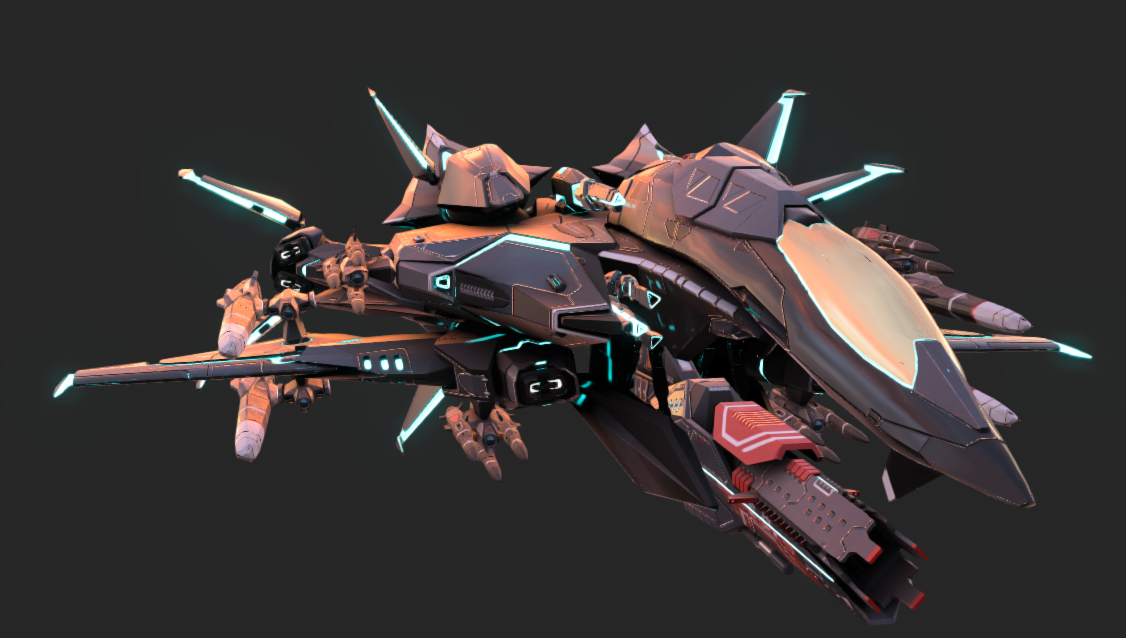
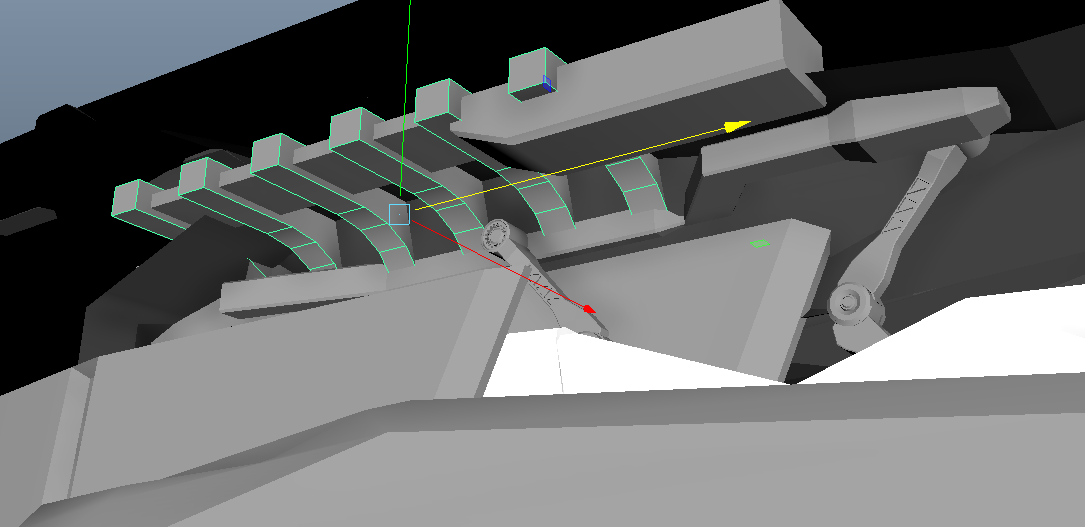
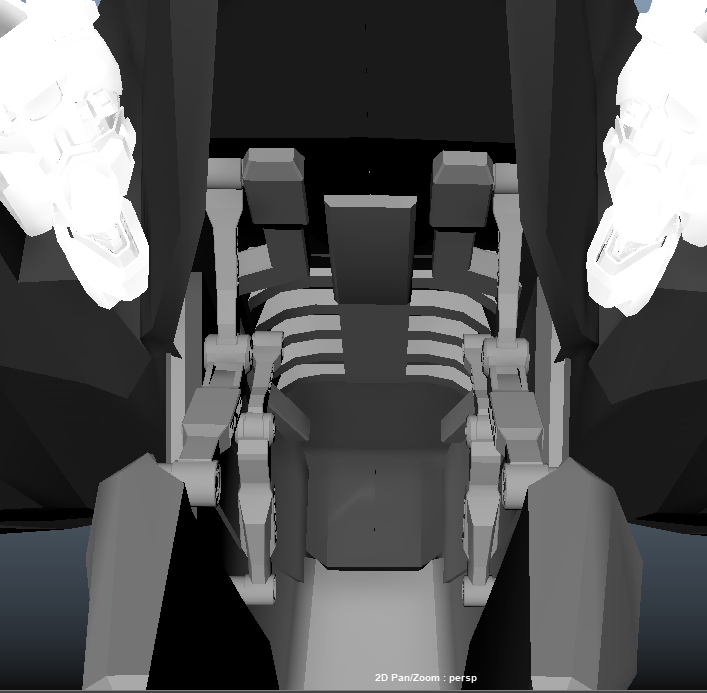
This is where the Marathon gets all its glowy blue pipes, pink lines, and dark red striping. The Marathon is meant to be less of a transformative breakthrough of new technologies like the Achilles, and more of a maturation of Freespace 2 era technology. The four large bays are meant to be shielded bomb containers – in the animated p3d preview of the Marathon, you can see the custom built bombs it carries.

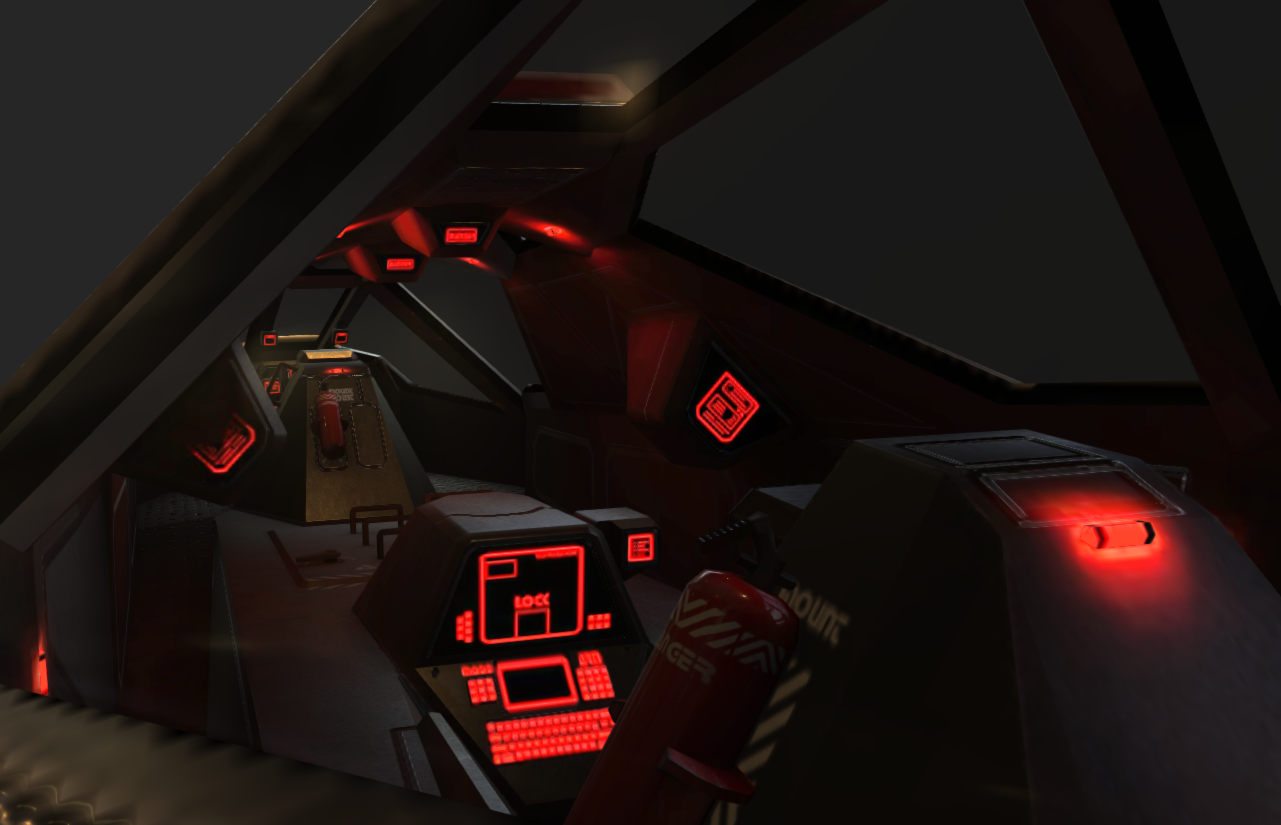
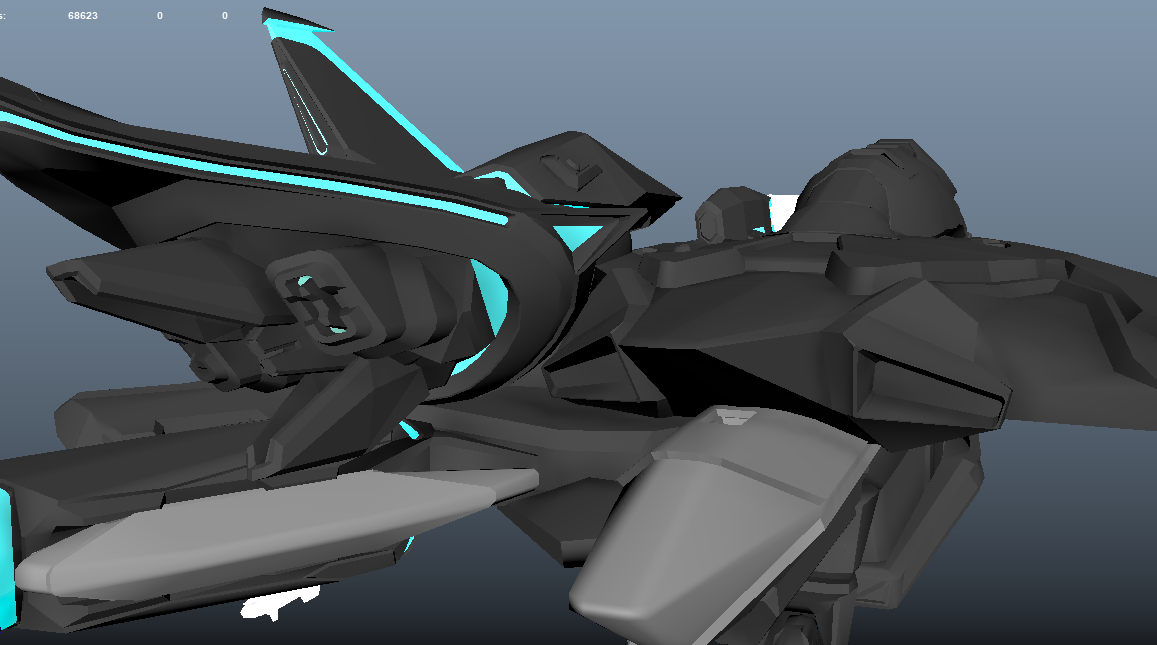
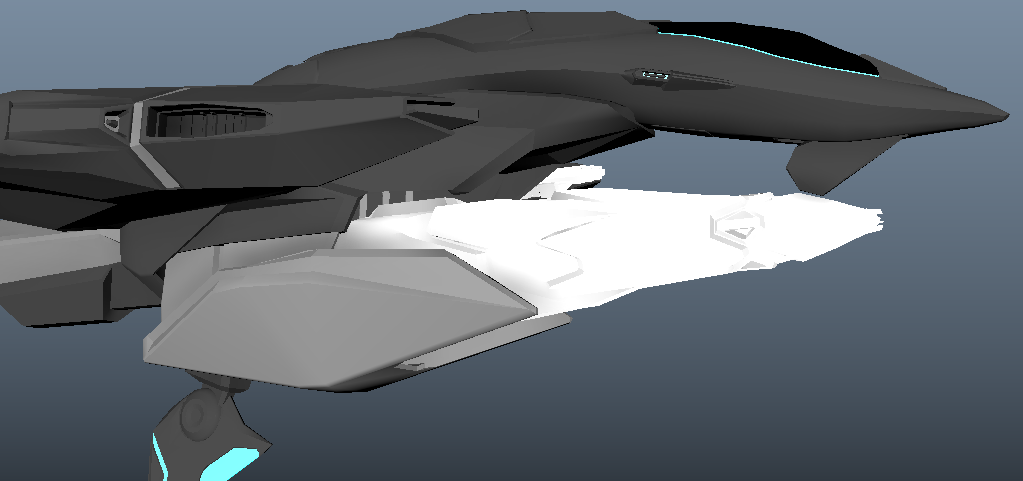
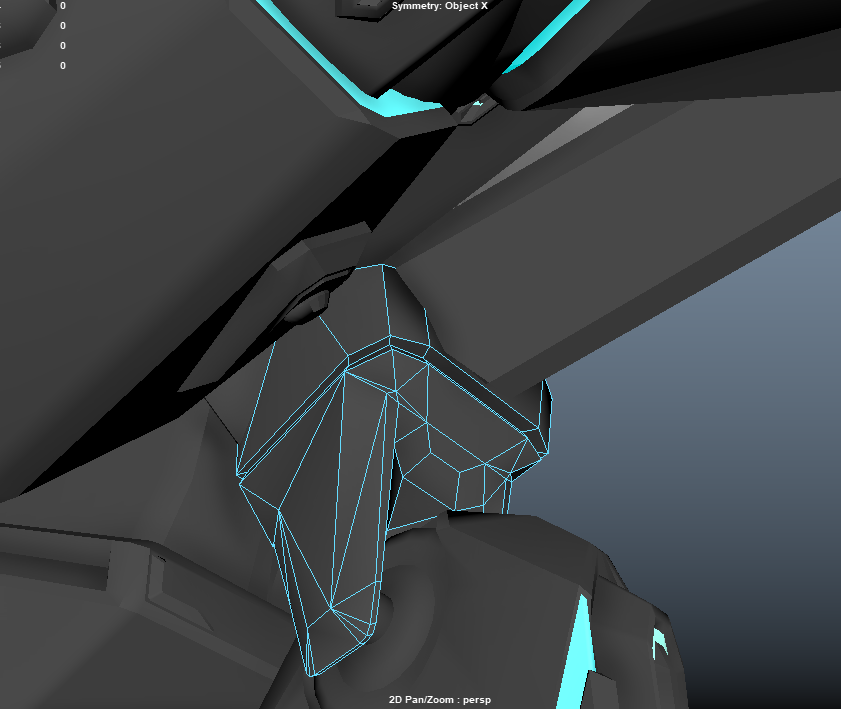
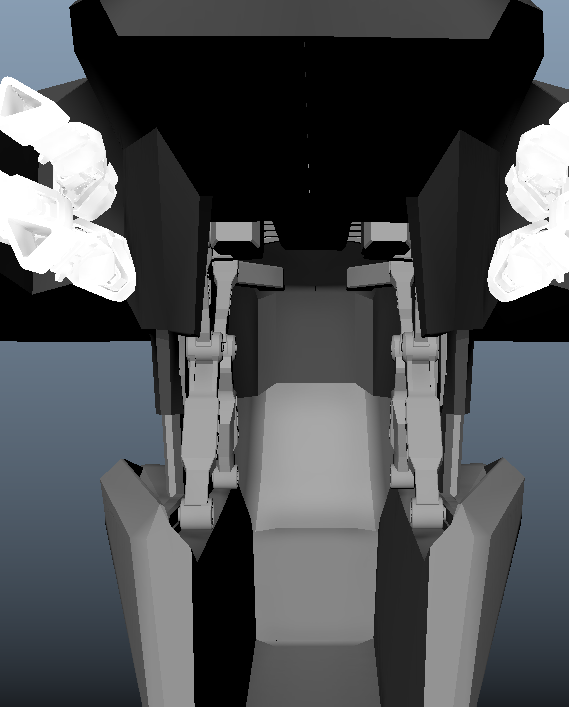
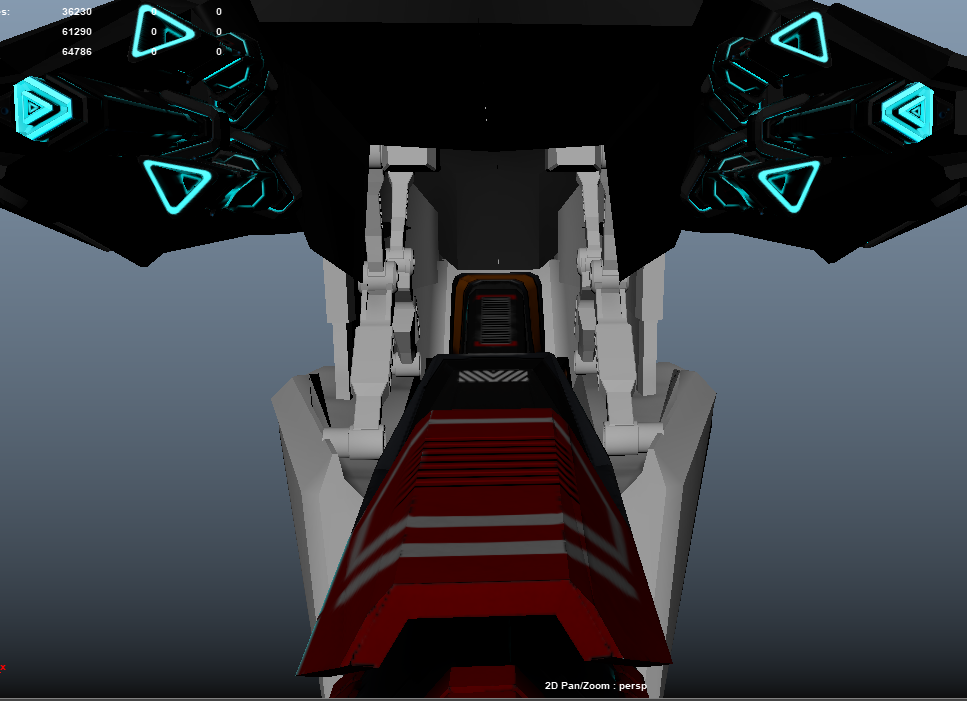
The Marathon allowed me to really apply a lot of lessons I learned from the Achilles when it comes to the UV mapping, but it also let me stretch my legs and try several ambitious things. One of which was a much more detailed interior compared to the Achilles! Here you can see the modeled pilot’s station, interior status displays, fire extinguishers, and just barely visible is the hatch that leads to the living area inside.

One of the key lessons from the Achilles was that if I want to use decals and labels, I need to ensure that some parts of the UV map aren’t mirrored. So to accomplish this, I ended up unwrapping the Marathon’s wings and interior first, doing them as a single substance project. This was critical because Substance actually makes it very difficult to texture interior surfaces, so several different projects were required anyways.

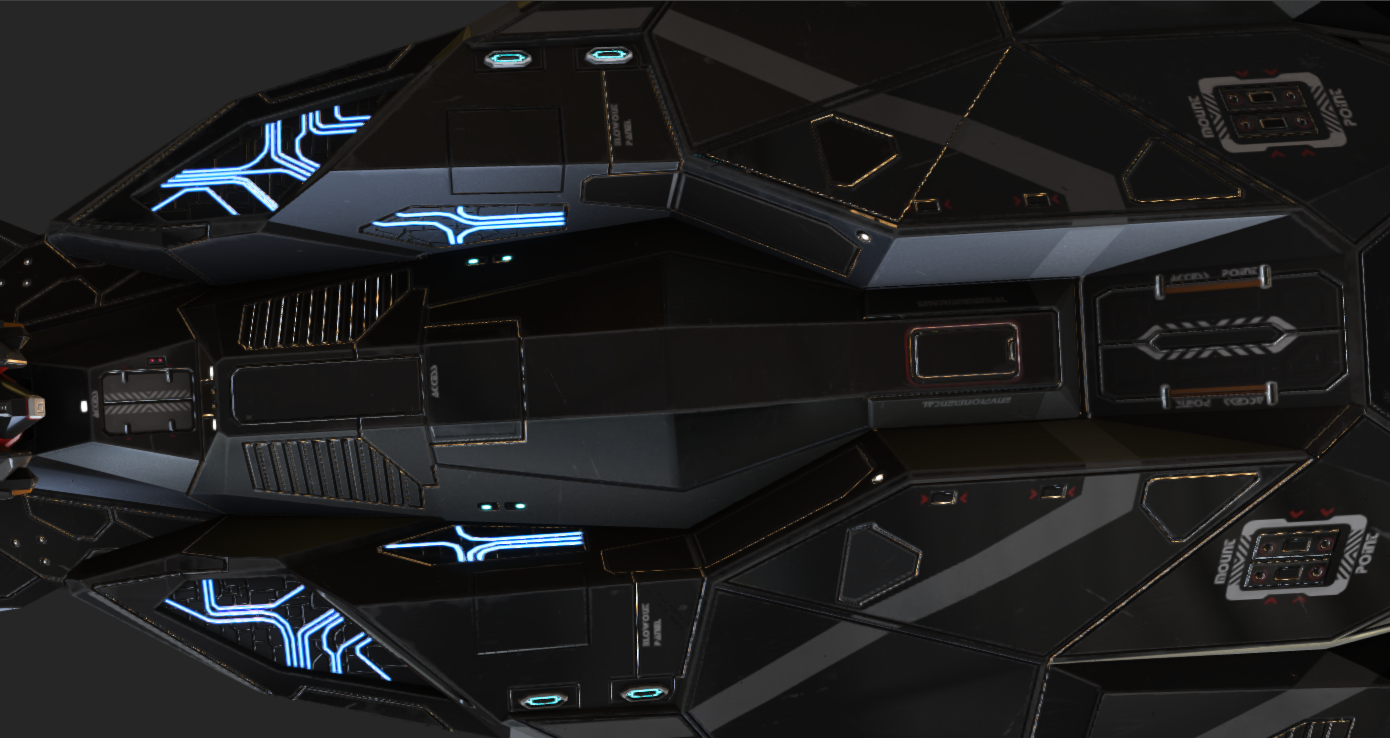
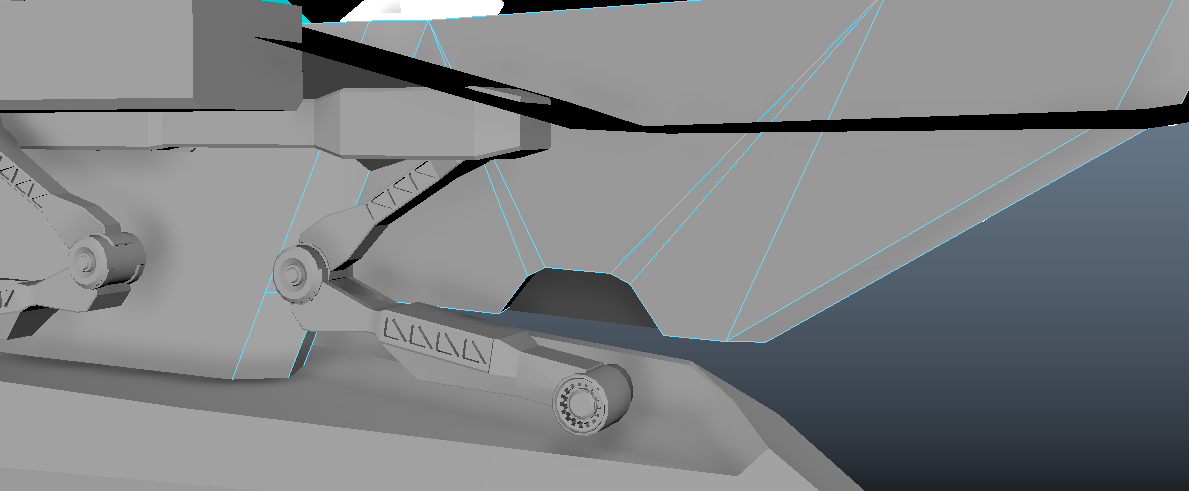
The front half of the ship including the fuselage was unwrapped without mirroring. This enabled me to paint on various blowout panel and access panel decals, which was quite fun. It was also quite fun to paint in the details for the main airlock behind the chin turret. The remaining rear half of the ship is mirrored, like the Achilles – which is why it has a lot less warning text.

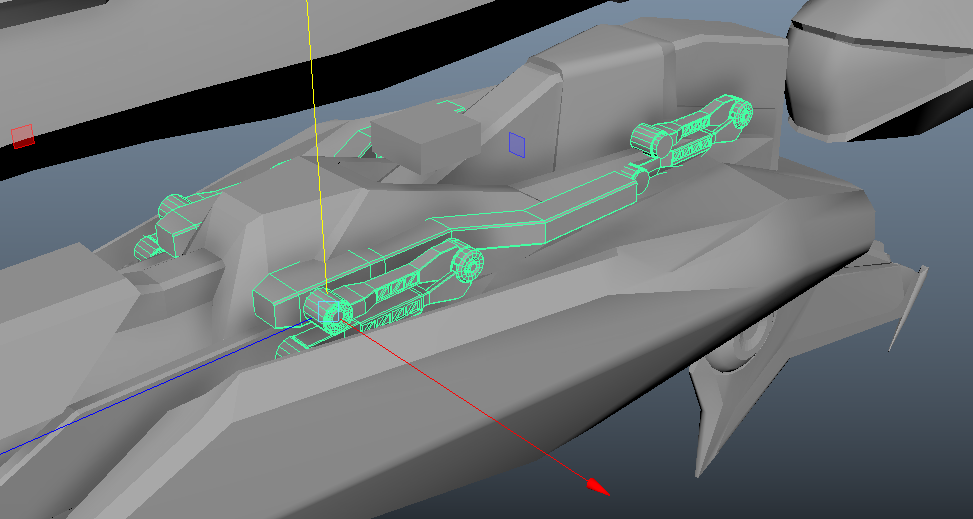
The biggest breakthrough came from changing up how I was doing edge weathering and dust on the main surfaces. I used a lot of techniques in this excellent video, and those were easily reapplied back to the Achilles. To end on a high note, one of the earlier projects this summer was taking advantage of p3d’s GLTF file format to upload animated previews. I’m sure you’ve noticed that the Marathon has animations showing its various missile bays opening and the wings animating – in addition to updating the Achilles textures over the course of about an hour, I was also able to produce a fully animated preview of the ship on p3d – click the image below!

I’m in the midst of a move, so updating will be sporadic going forwards. But it will not be as dead as this summer was. Next time, I’ll be discussing the next project!

Categories
Uncategorized

Kushan Frigate – Blocked Out

05/28/2021 – All right, finished up with a blockout of the Kushan frigate. If the biggest lesson of the Achilles was texture early and often, the lesson of this frigate is shaping up to be ‘don’t start any project without orthographic views’. That said, click the image below to go to a p3d view of the frigate as it stands right now.

It’s wildly different quality as you go across the hull, with the finished airlock and turning jets, the nicely detailed bridge section, and the still ultra-rough rear.

The next steps will be finishing up the belly module block-in so that the hatches I’ve modeled but not actually positioned yet can be textured. The p3d has one, and only one, awkwardly placed on the left side of the belly module right now. I doubt they’ll be part of any kinds of animations in a Homeworld game, but part of the joy of starship design is adding in functional details. After that, those hatches and the dorsal antenna will get unwrapped and textured next week.

Categories
Complete Projects May 2021

Frigate and Achilles Updates

05/18/2021 – Between another member of the Freespace community’s comments about the Achilles’ big belly weapons bay and my collaborator on the Warmachine project wishing he could have more small missiles, I took a brief detour to make another weapons system for it. Freespace Open can only support four different secondary weapons equipped to a craft, so that meant that with two different sets of stanchions for the heavy missiles, and the big belly gunpod, there was only one ‘bank’ available for lighter missiles. My collaborator would rather have preferred an option for more of the lighter swarm missiles at times, so we got to talking – what about a giant missile pod? A few days later and I’ve whipped it up successfully. Below is a render with the weapon equipped in its belly hardpoint (click for full resolution).

Click here to be view this model on p3d, and click here to see the missile bay amongst all the other weapons created for this fighter.

There’s also been some progress on the project I’d like to be focused on currently, the Kushan Ion Frigate (click for full resolution).

A number of issues with perspective on the initial sketch have dragged things to a slowdown, but there will be more progress and details to show off soon! You can see on the belly module there’s faintly visible an intricately modeled hatch I’m looking forward to getting textured, and the bridge module is feeling quite close to how I imagined it. The firing assembly at the nose still needs work of course, but for now it’s making progress.

Categories
May 2021

Ion Frigate – First Steps

05/11/2021 – I’ve gotten started on the Homeworld frigate I concepted out over the last two days. It’s a concept that’s been kicking around my head for an embarassingly long time, so I’d taken stabs at it in the past. Here’s the current progress:

The firing assembly at the nose is a holdover from one of the more recent attempts before starting to teach myself Maya. As is obvious, the turning thruster and airlock hatch details once completed got textured – they’re only 256×256 textures so they’re tiny. The engine in particular is probably really only about 128×256 so they’re going to be exceedingly easy to pack into whatever larger composite I need to make but for now are each their own independent texture. I’m not quite sure how to get the feel of Homeworld style textures in substance just yet, so they’re a bit experimental, and I would not be shocked if I had to update them later on when I narrow some things down. The remaining untextured hull has the ambient occlusion on it to help it be a bit less of a formless blob. I used a multiplier to make it gray instead of white.

The terracing along the side of the main hull here was accomplished largely through boolean operations instead of by inserting edges or verts and moving things around, too, which has yielded nice even results. I’m hoping to finish up the big armored clamshell tomorrow and then keep moving backwards on the hull to try and rough out all the shapes before getting too deep on any REALLY complicated component. No matter what shape the final frigate is, these turning thrusters and airlocks can easily be reused.

Categories
Complete Projects May 2021

Achilles Complete

05/06/2021 – The Achilles is the most ambitious project I’ve done as an amateur, and any time you push the limits you learn a lot. To keep it so the good stuff is up front, here’s links to three different p3d views of the fighter. The first two are with the wings open, in a dark space environment and in a lighter environment, and the third is with the wings closed. Click each thumbnail to be linked directly to the p3d! Do note that you can see through the cockpit floor through the bottom of the fuselage, this is a p3d bug not a feature.

The most important lesson I learned is that it is FAR easier to composite together multiple complete texture sheets like I did for the missiles than it is to unwrap and texture an object as complex as the Achilles in one go. When it came time to unwrap the main fighter itself my main goal was maximum quality – but I went about it all wrong. Let me break it down.

  1. I decided I wanted to maximize the amount of surface area on the unwrapped texture each component had. To do this I decided to split the fighter straight down the middle, unwrap one side, then mirror it across to get the other side. This meant giving up on any of the text decals I had so much fun with on the missiles. This is a bad approach because it leads to butterflying along the centerline. Much of that I was able to fix up but there’s still visible seams right down the centerline.
  2. I also wanted everything scaled properly to each other. This was an absolutely enormous delay, not to mention a task that sapped my desire to keep working on the project because it took ages to get Maya to unwrap without the program’s unwrap algorithm literally crashing. It would regularly reach some arbitrary limit for how many UV shells it could handle and then just dump the rest in a pile somewhere on the map.
  3. After that ordeal I decided I didn’t want to spend ages stitching together UV shells. I was anxious to get into Substance and start painting. From before I started doing anything in Substance to after I declared victory, I was still editing and fixing things in Maya as a consequence. Worst of all, Maya’s unwrap feature often splintered contiguous surfaces and scattered them around the map. In order to take advantage of modern textures’ mipmapping Substance will automatically grow the contents of a UV shell out to the boundary of the next UV shell. This would have been fine had all my UV shells been fairly comparable in size, but since Maya made lots of tiny splinters scattered around the ship often this meant dark regions were next to glowing regions. Also pursuant to point 1, I wanted to maximize my usage of space, so I told Maya to pack things with one pixel of padding between them. Maya’s smart, I thought. Maya can do that. That is a thing that can be done, I said confidently to myself.

Putting that all together, the ship is marred by a variety of obnoxious little flaws. If you look in the large open weapons bay you’ll see that meticulously modeled armature bizarrely speckling. That’s because of the issue I alluded to in point 3 above – a lot of those armature shells are next to glowing regions and they’re so tiny compared to the size of a pixel even on the Achilles’s gigantic 4k map, they get little bits of glowing blue on them. And this automatic spread between the shells is not something I can hardcode or edit, so the only way to mitigate it is erasing the blue on the neighbor that’s too close! While researching the problem I often found advice recommending padding distances of ten pixels between shells, as opposed to my incredibly optimistic 1 pixel boundary!

So how could I have done that better? What are the lessons to take home from this project?

  1. Once a complicated component is more or less finished – especially in a project like the Achilles with lots of transforming parts – it’s critical to consider unwrapping it completely and texturing it right then and there. This leads to enjoyable incremental progress and breaks the unwrapping step down into manageable chunks. I should have unwrapped the upper wing and lower wing together so that they were scaled correctly to each other. Then I could have applied what symmetry I wanted to and really gone to town on just those two objects. Then, once I had the engine modules, even though the upper and lower modules have different bases I could have taken the common geometry and unwrapped that, texturing that to completion. The success I had with compositing the missiles together into one texture sheet shows that getting perfectly accurate scaling between missiles or in this hypothetical example regions of the ship isn’t necessary – I guessed well enough with my texture sizes that none of the missiles look particularly low res compared to the rest. There’s no reason I needed to unwrap the internal structure of those weapon bays at the same time as the rest of the fighter as those will be rarely seen details.
  2. I should have broken apart the main body of the fighter in thirds. I should have mirrored the wings and the flat chassis of the fighter around a unified fuselage, instead of simple left/right mirrored symmetry. This would have been only slightly less inefficient than what I chose, and had I spent the time to stitch together the regions that Maya shattered that would have led to better results, without the obnoxious mirroring line down the center. It would also have given me a region that was not left/right symmetric to put plenty of the “danger” signs that I so enjoy.
  3. If I hadn’t done any of that, what I could have done is use Maya’s layout tool to generate square regions that were comparable to each other and then scaled them by hand. Again using the interiors of the weapons bay as an example, I could have just selected all those faces in Maya and used the Layout command to fill an arbitrary square sheet with them, then dragged them away from the rest of the fighter and simplify that way.

While working on the Achilles I regularly ran into problems with the ambient occlusion as well and that was because it will be in multiple different poses when fully implemented in Freespace, so the amount of light reaching a surface is not always consistent. I ended up saving out the ship with its wings closed or its missile bays closed and then generating fresh AO maps and hand compositing them together in a best-fit arrangement. Had I declared the wings “done” and then textured them in Substance and then moved on, they wouldn’t have the shadows cast by the rest of the fighter initially baked into them. This is a double edged sword and I suspect I would have needed to spend a few hours fixing up the same AO problems no matter what approach I had taken.

Final thoughts – I am incredibly excited to move on to something different. Having a detailed concept for the Ion Frigate will hopefully mean I spend less time trying to come up with interesting shapes within Maya like I did for the Achilles. It’ll also be a great testbed for the lessons I’ve learned from the Achilles, where I’ll want to split it in thirds and mirror the left third across the center third for an efficient but asymmetric texture. Plus Homeworld is how I got started with artwork so it will be an adventure – but that’s for later. For now, I’m thankful I aimed so high with the Achilles. I never would have really learned just how important it is to have semi regularly topology unless I’d tried to make it shiny like a car (or more accurately like its Tron inspirations). I never would have learned that there are serious practical limitations to Maya’s UV layout tools had I not relied too heavily on them for the Achilles. There’s a lot to be said for learning from others, but one of the best ways to learn is by trying on one’s own and I’m glad I did so for this project. Thanks for your patience!

Categories
April 2021

Ion Frigate – Concept

04/02/2021 – So, a week ago my back gave out again and I found myself needing to do more standing and moving around and stretching and a lot less sitting and modeling. That meant standing and drawing, so without further ado I present a preview of the next project, the Ion Frigate:

I ended up drawing this over about ten sessions based on how my back felt at the time. The upshot of that is that I got to make a fun little progress time lapse of the intermediate stages of development. With my back largely healed it will be time to try to finish up the Achilles geometry and progress to texturing it.

Categories
March 2021

Achilles – Cockpit

03/22/2021 – Over the weekend I spent a little time working on some details on the rear of the fighter. This region had always been chunky and without much to indicate functionality, so I’ve added what will be two large vents, presumably for dumping waste heat in the form of coolant. They can be viewed below:

The next area I was drawn towards, somewhat in spite of my own better judgment, was the cockpit. For the majority of the project this has been a thick opaque canopy over an otherwise undetailed portion of the fuselage. I was struck by two opportunities. I want to eventually render a sequence in Maya using this fighter – having a modeled cockpit will be necessary. The other opportunity was matching the UI of Freespace to panels within the cockpit. You can see how that turned out below:

The detail that bothers me currently is the struts for the instrumentation panels. I wanted them to be as unobtrusive as possible while still connecting to the fuselage. One iteration I experimented with had the instrumentation panels attached to the canopy instead of the fuselage and that just seemed a bit bizarre, though I may return.

There’s huge opportunities for iterating on this space – it could be the project of many weeks adding in pedals and carefully sculpted ergonomic interiors, but this really only needs to be good enough, not perfect. Here’s a render from Maya’s raytracing of the current fighter:

The other major change today was removing the belly pylon entirely. Without it the fighter still has an intimidating and aggressive, solid profile but feels less haphazard. The above version of the ship can be viewed in 3d form here.

Categories
March 2021

Achilles – Belly Winglet

03/19/2021 – Spent today merging the skeletal structure developed yesterday into the main body geometry while also merging the cowl into the weapons bay and refining a number of minor flaws with the shape. This should result in a good balance between how much UV mapping real estate will be consumed by all these details and how many verts it will all take up. A happy accident was that just as planned long ago, the gunpod could be swapped out for a single Sunflare heavy missile as below:The original plan was that the belly gunpod bay would come completely off and the missile would be rough mounted essentially directly to the roof of that internal bay I’d been modeling – hence why I’d spent so much time working on details for what was normally almost invisible in the standard configuration. However if (and only if!) the missile is loaded in after the bay is fully open, the gunpod cover can stay!This required some re-engineering of the winglet that was mounted there. I had wanted to lengthen it anyways to heighten the connection between the Achilles and the Perseus, and it needed a few fixes anyways. After some experimentation, it was shifted to the tail due aft of the animated weapons bay door, right above the main fuel tank. The base was remodeled for added functionality, now it has a bracket gripping the pivot point from two sides and I’ve roughly modeled in (but not separated the geometry) so that there might be a barbette and turret for the belly fin to rotate and use its thruster appropriately. And with that geometry for the underside of the entire fighter is nearly complete. The final rough patch is the upper back above the main fuel tank! Here is a p3d with the fighter as it stands.

Categories
March 2021

Achilles – Weapons Bay Detail

03/18/2021 – Today was spent adding more structure to the interior of the Achilles weapon bay, now that I’m liking the look of the armatures powering the opening and closing.The first addition was “ribs” to go with a central spine supporting the four arms. From way back in developing the internal missile bays, looking at reference images of F-22s with open weapon bays indicate this is typically what these spaces look like. Adding tons of cables and various outlets and electrical boxes would be the next order of business for a truly detailed implementation, but I don’t think that’s necessary for right now.Once mirrored, the structure looks like this. This is fine, though you can see that there’s some annoying clipping left to take care of before it really feels engineered and precise.This was an iteration I quite enjoyed. Pulling the cowl forward so it was flush with the upper hull and felt really integrated, and then carving out a void for the “wrist” of that armature to slide into. Unfortunately making everything rationally interact proved a bit harder.These final two images don’t do it justice, so I threw together a quick p3d model one can go to to see the space put together. Using the Boolean command to combine the main body with the upper receiver was not as easy as I would have hoped – it produced a lot of geometry that needed laborious cleanup and may still yet prove to be a source of a lot of frustration and disappointment. However, there are now tracks the arms run in, everything fits together nicely without any unsightly clipping, and I’m quite pleased with it. Whether or not I add any further details, we’ll see. I’m hoping I can continue finalizing and prettifying the remaining pieces of the ship at a good pace!

Categories
March 2021

Achilles Weapons Bay Refinements

03/16/2021 – I believe I’ve finalized the weapon bay design. I still need to add details. Pictures below.

Work started by reorganizing the weapons cluster inside the main body. The barrel shaped base was good but didn’t leave enough room for the weapon modules as I had developed them, and concealed a lot of their geometry. I intend to return to the shape in time, but for now I’ve moved to a slightly expanded arrangement – in part to fit the armatures I made yesterday.The next step was rebuilding the weapon bay’s armored cover – it had always been a rather haphazard, bulbous lump so something a bit more purposeful was a goal.Here you can see one arrangement of arms, nestled rather close around the top of the gunpods. I rather like this fully compacted arrangement with everything flattened, but it ran into some issues fitting alongside the very tall gunpods.

I did some experiments with moving “shields” attached to the elbows – this was all to fill in that negative space once the bay was opened. This sort of worked, but caused more problems fitting everything together. Instead of free floating animated shields, a three-quarters solid cowl was put in place. Additionally the armature was adjusted so instead of resting flat, it was resting with the arm slightly bent to increase the height. This means the mounting braces can be fixed directly to the ceiling of the internal weapons bay and no longer compete with the gunpod for space. There’s very slight clipping for now but that can be fixed with minor adjustments.And this is the final form for today’s work on the housing. Top view is with the full main body, bottom view has half of it cut away. The four arms are still present (and have enough room to possibly add more or bulk them up further) but there is a large shell with grooves that conceivably are tracks for the covering to move up and down. You can also get a good view of the remodeled gunpod covering, which hopefully will look a lot more purposeful. One thing to do is a bit of finalization on the perimeter of the gunpod shell, it’s had the main body roughly subtracted from it so it fits together but still doesn’t feel like it’s been engineered.